
티스토리 뷰
1. 사용 용도에 따른 Let’s Encrypt 설치 방법
1.1 Let`s Encrypt 설치
[root@nginx] apt-get install  letsencrypt -y

# Nginx용 설치
[root@nginx] apt install python3-certbot-nginx -y

# Apache용 설치
[root@nginx] apt install python3-certbot-apache -y
2. webroot 설정
# .well-known 디렉토리 생성
[root@nginx] mkdir -p /var/www/letsencrypt/.well-known/acme-challenge

# webroot 경로를 알려주는 letsencrypt.conf 파일생성
# /etc/nginx/snippets/경로에 생성
[root@nginx] vi /etc/nginx/snippets/letsencrypt.conf

location ^~ /.well-known/acme-challenge/ {
    default_type "text/plain";
    root /var/www/letsencrypt;
}

# Nginx conf 파일에서 위에서 만든 letsencrypt.conf Include
[root@nginx] vi /etc/nginx/conf.d/myhomepage.conf
server {
    listen 80 default_server;
    listen [::]:80 default_server ipv6only=on;
    server_name myhome.com www.myhome.com;

    include /etc/nginx/ssl/letsencrypt.conf;

    location / {
        return 301 https://www.myhome.com$request_uri;
        expires epoch;
        # return 301 아래에 expires epoch; 설정은 301 리다이렉트가 캐싱 불가 설정
    }
}

# 인증서 발급
[root@nginx] certbot certonly --webroot --webroot-path=/var/www/letsencrypt \
             -d 사이트명.com -d www.사이트명.com

#-webroot-path > .well-known위치
3. 웹서버용 설정
# Nginx 인증서 발급
[root@nginx] certbot --nginx -d 사이트명.com -d www.사이트명.com

# Apache 인증서 발급
[root@nginx] certbot --apache d 사이트명.com -d www.사이트명.com

# 자동 갱신 > 아래의 명령으로 크론잡을 만들어주면 된다.
[root@nginx] certbot renew --dry-run
4.Standalone 설정
[root@nginx] systemctl stop nginx
[root@nginx] certbot certonly --standalone -d 사이트명.com -d www.사이트명.com
[root@nginx] systemctl start nginx
5. DH Param 생성 및 적용
5.1 보안 강화를 위한 DH Param 적용
DH Param이란 일부 암호화 알고리즘에 사용되는 큰 난수를 생성해서 암호화 성능향상과 보안을 높이는 방법
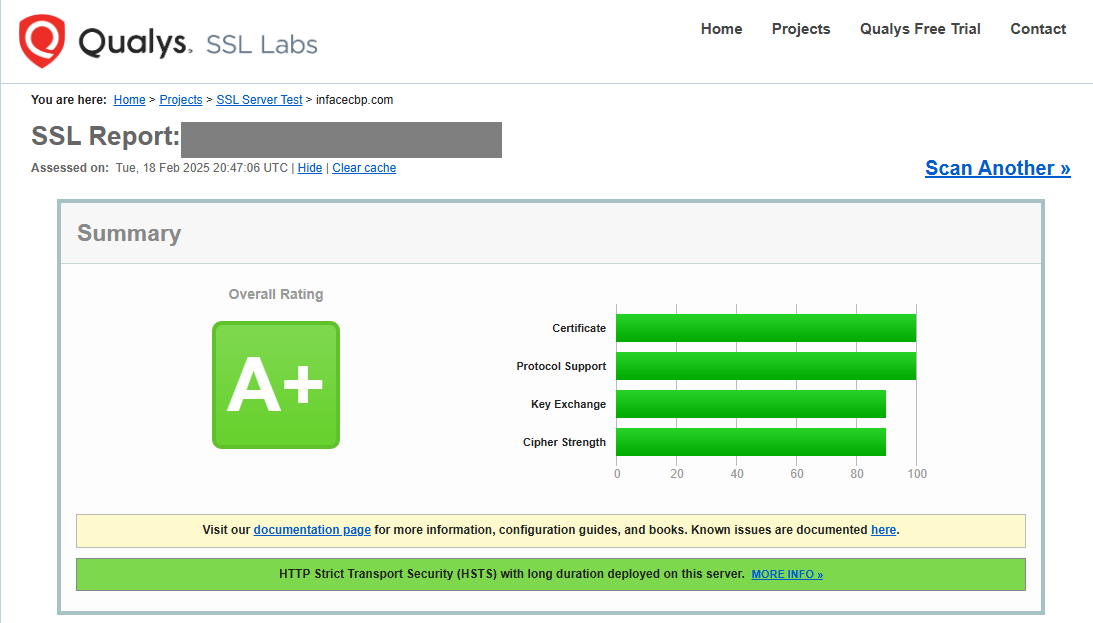
DH Param 미적용시 보안등급이 A-가 나오는 반면 적용시에 A+ 보안등급이 나온다.
[root@nginx] mkdir -p /etc/nginx/ssl
[root@nginx] cd /etc/nginx/ssl
[root@nginx] openssl dhparam -out dhparams.pem 4096  # 2048비트로 하려면 4096대신 2048로 대체 한다.
[root@nginx] openssl rand 48

# session_ticket.key  세션 티켓키도 생성 시키는 시간이 거의 걸리지 않는다.
6. Nginx 설정
[root@nginx] vi /etc/nginx/conf.d/myhome.conf

upstream myhome {
   ip_hash;
   server  192.168.10.2:8080;
}

server {
    if ($host = myhome.co.kr) {
        return 301 https://$host$request_uri;
    } # managed by Certbot


    if ($host = www.myhome.co.kr) {
        return 301 https://$host$request_uri;
    } # managed by Certbot


    listen 80;
    server_name myhome.co.kr www.myhome.co.kr;
    return 301 https://$host$request_uri;
}

server {
    listen [::]:443 ssl http2 ipv6only=on;
    listen 443 ssl http2;
    server_name myhome.co.kr www.myhome.co.kr;

    # SSL 보안을 위해서는 Gzip 사용을 중지하라고 권고
    gzip off;

    ssl_certificate /etc/letsencrypt/live/myhome.co.kr/fullchain.pem; # managed by Certbot
    ssl_certificate_key /etc/letsencrypt/live/myhome.co.kr/privkey.pem; # managed by Certbot
    ssl_trusted_certificate /etc/letsencrypt/live/myhome.co.kr/chain.pem;
    ssl_dhparam /etc/nginx/ssl/to/dhparam;

    # intermediate configuration
    ssl_session_timeout 10m;
    ssl_session_cache shared:SSL:10m;
    ssl_protocols TLSv1 TLSv1.1 TLSv1.2;
    ssl_prefer_server_ciphers on;
    ssl_ciphers 'ECDHE-RSA-AES128-GCM-SHA256:ECDHE-ECDSA-AES128-GCM-SHA256:ECDHE-RSA-AES256-GCM-SHA384:ECDHE-ECDSA-AES256-GCM-SHA384:DHE-RSA-AES128-GCM-SHA256:DHE-DSS-AES128-GCM-SHA256:kEDH+AESGCM:ECDHE-RSA-AES128-SHA256:ECDHE-ECDSA-AES128-SHA256:ECDHE-RSA-AES128-SHA:ECDHE-ECDSA-AES128-SHA:ECDHE-RSA-AES256-SHA384:ECDHE-ECDSA-AES256-SHA384:ECDHE-RSA-AES256-SHA:ECDHE-ECDSA-AES256-SHA:DHE-RSA-AES128-SHA256:DHE-RSA-AES128-SHA:DHE-DSS-AES128-SHA256:DHE-RSA-AES256-SHA256:DHE-DSS-AES256-SHA:DHE-RSA-AES256-SHA:AES128-GCM-SHA256:AES256-GCM-SHA384:AES128-SHA256:AES256-SHA256:AES128-SHA:AES256-SHA:AES:CAMELLIA:DES-CBC3-SHA:!aNULL:!eNULL:!EXPORT:!DES:!RC4:!MD5:!PSK:!aECDH:!EDH-DSS-DES-CBC3-SHA:!EDH-RSA-DES-CBC3-SHA:!KRB5-DES-CBC3-SHA';

    # OCSP stapling ssl_stapling on;
    ssl_ecdh_curve X25519:sect571r1:secp521r1:secp384r1;
    ssl_stapling on;
    ssl_stapling_verify on;

    # HSTS (ngx_http_headers_module is required) (63072000 seconds)
    add_header X-Frame-Options SAMEORIGIN always;
    add_header X-Content-Type-Options nosniff;
    add_header X-XSS-Protection "1; mode=block";
    add_header Strict-Transport-Security "max-age=63072000";

    location / {
                       if ($domain_allowed_country = no) {
                           return 403;
                        }
                        proxy_set_header Host $http_host;
                        proxy_set_header X-Real-IP $remote_addr;
                        proxy_set_header X-Forwarded-For $proxy_add_x_forwarded_for;
                        proxy_set_header X-Forwarded-Proto $scheme;
                        proxy_set_header X-NginX-Proxy true;
                        proxy_pass http://myhome;
                        proxy_redirect off;
                        send_timeout 300;
                        proxy_max_temp_file_size 0;
                        client_max_body_size 0;
                        proxy_read_timeout 1800;
                        proxy_connect_timeout 1800;
                        proxy_send_timeout 1800;
                        proxy_request_buffering off;
                        charset utf-8;
    }
}
7. 인증서 보안 확인
SSL Server Test (Powered by Qualys SSL Labs)
SSL Server Test This free online service performs a deep analysis of the configuration of any SSL web server on the public Internet. Please note that the information you submit here is used only to provide you the service. We don't use the domain names or
www.ssllabs.com
위 사이트 SSL Labs에서 SSL 테스트
8. 인증서 사용법
8.1 인증서 만료일 확인
[root@nginx] certbot certificates
8.2 인증서 해지
[root@nginx] certbot revoke --cert-path /etc/letsencrypt/live/도메인.com/cert.pem
8.3 인증서 삭제
[root@nginx] certbot delete --cert-name 도메인주소
8.4 인증서 자동 갱신
# 인증서 갱신 명령어
## 갱신 테스트
[root@nginx] certbot renew --dry-run

## 인증서 갱신 방법
[root@nginx] certbot renew
[root@nginx] certbot renew --pre-hook "systemctl stop nginx" --renew "systemctl start nginx"
[root@nginx] certbot renew --quiet --renew-hook "service nginx reload"

## certbot renew에서 지원하는 hook
[root@nginx] certbot renew --pre-hook,--post-hook , --deploy-hook, renew-hook

## crontab 등록
## 환경에 맞는 갱신 방법을 선택하여 스케줄에 등록 하면 된다.
crontab -e
0 2 * * * /usr/bin/certbot renew --quiet --renew-hook "service nginx reload"
0 2 * * * /usr/bin/certbot renew

## 여러개의 도메인을 관리 할 경우 nginx에서 사용하는 80포트가 열려 있으면 갱신이 안된다.
## 이런 경우는 스크립트를 만들어 처리를 한다.
Let`s Encrypt 인증서 4가지 발급 방법
[Ubuntu]Ubuntu 20.04 Let’s Encrypt SSL 인증서 4가지 발급 방법
1. Let’s Encrypt SSL 인증서 발급 방법1. 1 webroot . 사이트 디렉토리 내에 인증서 유효성을 확인할 수 있는 파일을 업로드하여 인증서를 발급하는 방법. 실제 작동하고 있는 웹서버의 특정 데렉토리
dreamsea77.tistory.com
참고 사이트
최신 Let’s Encrypt SSL 인증서 발급 방법 4가지 정리 | 꿈꾸는섬
마케팅 경영 사례 연구 및 트렌드 탐구
happist.com
Let’s Encrypt SSL 인증서 발급 및 자동 갱신 방법(업데이트) | 꿈꾸는섬
마케팅 경영 사례 연구 및 트렌드 탐구
happist.com
최신 보안 트렌드를 반영한 Let’s Encrypt 인증서 세팅 방법 | 꿈꾸는섬
마케팅 경영 사례 연구 및 트렌드 탐구
happist.com
'System > Linux' 카테고리의 다른 글
| [Ubuntu]Ubuntu 20.04 Let’s Encrypt SSL 인증서 4가지 발급 방법 (0) | 2025.02.14 |
|---|---|
| [UBUNTU22.04]DOCKER 설치 (0) | 2023.10.20 |
| [Haproxy]Ubuntu 20.04 Haproxy 2.6 설치 및 설정 (0) | 2022.11.02 |
| SHFS - 원격 디렉토리 마운트 사용 방법 (0) | 2022.10.19 |
| [Ubunut]ubuntu 20.04 부트로더 복구 (0) | 2022.05.26 |
- Total
- Today
- Yesterday
- Letsencrypt wildcard
- Letsencrypt+nginx
- logstash
- 인증서설치
- letencrypt
- 마이바티스CamelCase
- #logback
- 마이바티스
- letsencrypt
- Intellj들여쓰기
- nginx
- SSL인증서
- camelcase
- SSL
- 인증서자동갱신
- elk8.x
- Letsencrypt wildcard auto renew
| 일 | 월 | 화 | 수 | 목 | 금 | 토 |
|---|---|---|---|---|---|---|
| 1 | 2 | 3 | 4 | 5 | 6 | 7 |
| 8 | 9 | 10 | 11 | 12 | 13 | 14 |
| 15 | 16 | 17 | 18 | 19 | 20 | 21 |
| 22 | 23 | 24 | 25 | 26 | 27 | 28 |
| 29 | 30 |